update: Following tutorial is outdated and no longer maintained, I recommend you to go here for updates.
Hi, as you probably already know, making gtkmm work on Windows is not a simple task and since I spent so many days compiling all on my own, I decided to write a step by step blog on how to make things work the easy way for those who fail to compile.
In "Step 9" of this how-to you'll be shown how to check if your gtkmm version indeed is latest one.
Just in case you stuck at some point you can watch following video where I show how to correctly install latest version of gtkmm by following this tutorial (sorry for bad quality first few seconds).
This tutorial will guide you not only trough installment of latest gtkmm version but we will also cover how to setup complete development environment, IDE setup, gtkmm project templates, installing user interface designer, dark theme setup for your IDE and "integrated" official tutorial inside the IDE so that you can learn gtkmm faster.
You can quickly look at the screenshots at the end to see what I mean. (click on screenshot to enlarge)
To learn more about what gtkmm is read this.
To be 100% certain that these steps fully work I uninstalled almost everything from my system needed for gtkmm programming as I write this blog...
Right now I will go on and install everything from scratch and as I take steps I will write them here
We'll cover installment of MinGW-w64 and MSYS2 shell, you can read more about MSYS2 project here (don't download yet).
Big thanks to Alexpux and other people who contribute to this astonishingly good project
You need to understand that after finishing all the steps here what you'll be using is GNU compiler collection and an IDE other than Visual Studio.
There are good and bad news about this:
Bad news:
Visual Studio is my favorite IDE but it requires you to manually compile gtkmm in order to use latest gtkmm.
GCC ships with GDB debugger so all the nice features of integrated debugger in Visual Studio will not be available and you'll have to stick with GDB.
Good news:
GNU C++ compiler is my number one because it fully supports C++11 features, so if you want to use gtkmm in Visual Studio you will not be able to compile C++11 code with MSVC.
MSVC is way behing GCC and since we want both, latest gtkmm and C++11 we will do all the steps here...
You can compare C++11 support GCC vs MSVC
I'm currently on Windows 7 64bit, but you can apply these steps to any other Windows by just modifying few steps, I will let you know which steps and how exactly as you read on...
STEP 1 (Setting up MSYS2)
Create a new directory on C:\ or D:\ partition,
This new root directory will serve us for all of the development stuff, that we create here, please make sure your directory name (full path) does not contain spaces and characters considered "special" by unix shell.
In my case I will use D:\dev in this tutorial, so you can do the same for the process to be easy to follow.
Also create another folder and name it "setup" in D:\dev
Download MSY2 from this website and save it into D:\dev\setup
If you're on x86 Windows you will downlaod msys2-i686
If on x64 (same as me) you will download msys2-x86_64
Run your MSYS2 installer and install it into D:\dev\msys64 (or D:\dev\msys32 for x86 users).

From now on you will replace 64 with 32 and similar naming shemas if you're using 32 bit Windows...
Even though there are official steps to perform the installation we cover them here so that you don't have to go away:
Once installer is completed, leave "Run msys64bit now" checkbox enabled and click finish...

this will open up a unix-like shell, once it opens you must close it down...
Just in case if you want to learn more about unix commands you can read this
MSYS2 uses pacman package manager, you can (and should) read more about pacman here
Now go to D:\dev\msys64 and run mingw64_shell.bat
Type the following command:
pacman -Sy
It is possible that output of this command will fail with several errors such as failure to retrieve file,
if so go to step 3 (Fixing errors) find Error 1 section and apply the fix.
Hint: you can also copy paste commands into console instead of typing.
Also from now on make sure you watch out very carefully for error outputs, these errors will help you to reference your problems by looking into step 3 just in case.
It's not only errors that we should look at, we should also apply fixes for possible warnings by looking at step 3 on how to apply fixes.
if there are more warnings or errors coming out of single command apply them in order they appear.
Once done type following and hit enter when asked:
pacman --needed -S bash pacman pacman-mirrors msys2-runtime
Once the above command is done with execution you must restart the console.
Once restarted type this and press enter when asked:
pacman -Su
After ensuring there are no error outputs right click on console top frame and click
options > Window and set "Scrollback lines" to 30 000, this will ensure you can scroll back trough console just in case you miss to read error outputs.
Let's add D:\dev\msys64\mingw64\bin into PATH like so:
Go to control panel > System > Advanced system settings > Environment variables and find "Path" under "System variables" select it and click edit button...
now at the end of "variable value" add ;D:\dev\msys64\mingw64\bin like this:
WARNING: make sure you do not delete existing entries!

click OK..OK..OK to save these settings.
This is also needed to launch your applications on your system later..
STEP 2 (Installing packages)
In order for this step to be success it is important that you follow the order of installment!
Open up mingw64_shell.bat and start typing:
x86 bit users:
pacman -Ss | grep gcc | grep i686
x64 bit users:
pacman -Ss | grep gcc | grep x86_64
This will list toolchain packages, find your toolchain...

we use the grep tool to reduce/filter the output read more about grep here
Remember that if you're using 32bit Windows you need to install packages which contain the "i686"... not "x86_64"
Once you found the package name install it like so:
pacman -S mingw-w64-x86_64-gcc
Hit enter and wait to complete then type:
pacman -Ss | grep make
Find what you need and install:
pacman -S mingw-w64-x86_64-make
pacman -S make
Next find auto tools:
pacman -Ss | grep auto
In my case I will install currently latest version of automake.
pacman -S automake1.15
And also following tools
pacman -S autoconf
pacman -S autogen
Next we want to find pkg-config utility by:
pacman -Ss pkg-config
In my case I'm going to install:
pacman -S pkg-config
pacman -S mingw-w64-x86_64-pkgconf
At this point we will "forward create" following directories before we go on.
(some packages could fail if these directories do not exist)
mkdir /mingw32/lib/gdk-pixbuf-2.0
mkdir /mingw32/lib/gdk-pixbuf-2.0/2.10.0
mkdir /mingw64/lib/gdk-pixbuf-2.0
mkdir /mingw64/lib/gdk-pixbuf-2.0/2.10.0
mkdir /mingw64/lib/gtk-3.0
mkdir /mingw64/lib/gtk-3.0/3.0.0
mkdir /mingw64/lib/pango
mkdir /mingw64/lib/pango/1.8.0
Make sure you use -Ss to find package name for following packages:
pacman -S mingw-w64-x86_64-icon-naming-utils
pacman -S mingw-w64-x86_64-hicolor-icon-theme
pacman -S mingw-w64-x86_64-freetype
pacman -S mingw-w64-x86_64-fontconfig
pacman -S mingw-w64-x86_64-gnome-icon-theme-symbolicNext we find tools to design user interfaces in glade designer:
pacman -Ss glade
read more about glade here
I will install in following order:
pacman -S mingw-w64-x86_64-libglade
pacman -S mingw-w64-x86_64-glade
Here are few additional tools we will need in order to complete remaining steps in this tutorial:
pacman -S intltool
pacman -S wget
pacman -S tar
pacman -S itstool
pacman -S vim
Finally we install latest gtkmm, first let's find package name by typing:
pacman -Ss | grep gtkmm3
I will install it like so:
pacman -S mingw-w64-x86_64-gtkmm3
Hopefully there will be no warnings/errors in the output of above commands.
Make sure you watch outputs very carefully to ensure everything goes nice and smooth, do not ignore warnings, fix them instead.
Depending on your output you can identify your errors in next step.
STEP 3 (Fixing errors)
Here is a list of possible errors and what to do to fix them.
Error 1:
error: failed retrieving file 'mingw32.db' from 148.251.42.38 : Failed to connect to 148.251.42.38 port 21: Operation not permitted
FIX:
To solve this download modified files here and save them into D:\dev\setup then extract and replace contents into D:\dev\msys64\etc
If you're afraid of downloading you can visit this site and fix the problem without downloading.
Now again run:
pacman -Sy
Error 2:
error: failed retrieving file...
FIX:
1.) Try to run the command several times until all errors are gone.
2.) Try to reset your internet connection.
3.) Make sure your firewall allows outbound connection.
Here is list of outbound ports you need to allow if your firewall blocks you:
D:\dev\msys64\usr\bin\pacman.exe PORT: 80
D:\dev\msys64\usr\bin\ssh.exe PORT: 22
D:\dev\msys64\usr\lib\git-core\git-remote-https.exe PORT: 443
D:\dev\msys64\usr\bin\git.exe PORT: 9418
D:\dev\msys64\usr\bin\curl.exe PORT: 21, 80
D:\dev\msys64\usr\bin\wget.exe PORT: 80
There is no need to allow inbound connections.
Error 3:
No schema files found: doing nothing.
FIX:
You can ignore this because once gtk3 package is installed schema files will be available, we will even test this in step 4.
Alternatively if test in step 4 fails, you can install gsettings package before the package that results in this error, however this could result in additional warnings later on:
pacman -S mingw-w64-x86_64-gsettings-desktop-schemas
Error 3:
updating font cache... /mingw64/bin/fc-cache.exe: error while loading shared libraries: ?: cannot open shared object file: No such file or directory
This error is due to fc-cache.exe not being able to load shared libraries, you can read more about this tool here
If you've read carefully your output you will notice that fontconfig was installed before freetype and that's the reason of this error.
You need to install fontconfig package after freetype package and problem will be resolved.
Error 4:
Failed to create file 'D:\dev\msys64\mingw64\lib\gdk-pixbuf-2.0\2.10.0\loaders.cache.IR8USX': No such file or directory
FIX:
To fix this error you need to create following directories and re-install pixbuf package:
mkdir /mingw32/lib/gdk-pixbuf-2.0
mkdir /mingw32/lib/gdk-pixbuf-2.0/2.10.0
mkdir /mingw64/lib/gdk-pixbuf-2.0
mkdir /mingw64/lib/gdk-pixbuf-2.0/2.10.0
Error 5:
gtk-update-icon-cache-3.0.exe: Failed to open file mingw64/share/icons/hicolor\.icon-theme.cache : No such file or directory
FIX:
This error is due to missing icons, if you ignore this error you will most likely see a lot of assertion errors in std out while programming with gtkmm...
You need to install following packages in this order:
icon-naming-utils
hicolor-icon-theme
freetype
fontconfig
gnome-icon-theme-symbolic
Error 6:
Could not find gtk-update-icon-cache
FIX: This happens because gtk-update-icon-cache does not exist in this package, instead there is
a gtk-update-icon-cache-3.0.
You have two options:
Option 1:
Install GTK2 package (recommended)
Option 2:
patch configure script with following command and reconfigure the script:
find /opt/gnome-icon-theme-3.12.0/configure -type f | xargs sed -i 's/gtk-update-icon-cache/gtk-update-icon-cache-3.0/g'
Error 7:
error: failed to commit transaction (unexpected error)
FIX:
Try to run the command that resulted in this error once again and problem should be resolved.
Error 8:
Error loading theme icon 'image-missing'
FIX:
This error appears in std out when you run application that uses gnome icons which are not installed.
It could also happen while running gtk-update-icon-cache
Run following commands one by one resolve this:
cd /opt
wget http://ftp.acc.umu.se/pub/GNOME/sources/gnome-icon-theme/3.12/gnome-icon-theme-3.12.0.tar.xz
tar -xvf gnome-icon-theme-3.12.0.tar.xz
cd gnome-icon-theme-3.12.0
./configure --prefix=/mingw64
make
make install
If the above wget link does not work or if you want to be sure to compile latest version you can modify these commands after finding appropriate link here
cd /opt
wget http://ftp.acc.umu.se/pub/GNOME/sources/gnome-icon-theme-extras/3.12/gnome-icon-theme-extras-3.12.0.tar.xz
tar -xvf gnome-icon-theme-extras-3.12.0.tar.xz
cd gnome-icon-theme-extras-3.12.0
./configure --prefix=/mingw64
make
make install
If the above wget link does not work or if you want to be sure to compile latest version you can modify these commands after finding appropriate link here
gtk-update-icon-cache -f /mingw64/share/icons/gnome/
gtk-update-icon-cache -f /mingw64/share/icons/hicolor/
gtk-update-icon-cache-3.0 -f /mingw64/share/icons/gnome/
gtk-update-icon-cache-3.0 -f /mingw64/share/icons/hicolor/
Rebuild your project and run to see if problem is resolved.
Error 9:
error: failed to prepare transaction (could not satisfy dependencies)
FIX:
You are probably trying to remove a package but other packages depend on this package, to solve this you need to remove dependent packages as well like this:
pacman -Rc <package name>
Error 10:
gtk-update-icon-cache.exe: No theme index file.
FIX:
Apply the fix from "Error 8"
Warning 1:
warning: dependency cycle detected:
warning: mingw-w64-x86_64-fontconfig will be installed before its mingw-w64-x86_64-freetype dependency
After you applied a fix from "Warning2" and "Warning3" you can safely ignore this warning because you will re-install fontconfig by running:
pacman -S mingw-w64-x86_64-fontconfig
this will probably take some time...
Warning 2:
warning: dependency cycle detected:
warning: mingw-w64-x86_64-harfbuzz will be installed before its mingw-w64-x86_64-freetype dependency
FIX:
Reinstall harfbuzz and continue where this happened:
pacman -S mingw-w64-x86_64-harfbuzz
Warning 3:
warning: dependency cycle detected:
warning: mingw-w64-x86_64-cairo will be installed before its mingw-w64-x86_64-fr eetype dependency
Reinstall cairo and continue where this happened:
pacman -S mingw-w64-x86_64-cairo
warning: dependency cycle detected:
FIX:
look at one line bellow to see which warning exactly happened, then find appropriate fix.
Warning 5:
warning: Schema 'org.gnome.system.locale' has path... Paths starting with '/apps/', '/desktop/' or '/system/' are deprecated.
FIX:
currently not available, you can ignore this for now.
STEP 4 (Testing installation)
Finally we must test installation in order to be sure that everything works as it should, here is a list of commands for this purpose:
pango-querymodules --update-cache
gdk-pixbuf-query-loaders --update-cache
gtk-query-immodules-3.0 --update-cache
fc-cache --verbose
glib-compile-schemas /mingw64/share/glib-2.0/schemas
gtk-update-icon-cache /mingw64/share/icons/gnome/
gtk-update-icon-cache /mingw64/share/icons/hicolor/
gtk-update-icon-cache-3.0 /mingw64/share/icons/gnome/
gtk-update-icon-cache-3.0 /mingw64/share/icons/hicolor/
/mingw64/bin/gtk-demo
If any of the above commands results in an error you can try to find a fix in step 3 or review your installation process and make sure there are no error outputs, installing packages in correct order will solve the problem.
If you wish to uninstall everything to try again you need to run maintenancetool in D:\dev\msys64
STEP 5 (Setting up development environment)
At this point all of the hard work is behind us...
First thing we need to do in this step is to get the flags needed for compilation, type:
pkg-config --cflags --libs gtkmm-3.0
This will output all the compiler flags needed to compile gtkmm applications.
I will also check the flags for GTK+ by typing:
pkg-config --cflags --libs gtk+-3.0
This are the flags for GTK+ stack if you're C programmer, but in that case you didn't have to install gtkmm in the first place...
GTK+ libraries have been auto-installed since gtkmm is C++ interface of GTK+
The output of above commands should looks like this:

Run following:
mkdir /d/dev/settings
We should "extract" these flags into notepad for later use,
here is my extraction (you can copy that into notepad and save into D:\dev\settings for later use)
Compiler flags:
-pthread
-mms-bitfields
$(ROOTDIR)\include\gtkmm-3.0
$(ROOTDIR)\lib\gtkmm-3.0\include
$(ROOTDIR)\include\atkmm-1.6
$(ROOTDIR)\include\gdkmm-3.0
$(ROOTDIR)\lib\gdkmm-3.0\include
$(ROOTDIR)\include\giomm-2.4
$(ROOTDIR)\lib\giomm-2.4\include
$(ROOTDIR)\include\pangomm-1.4
$(ROOTDIR)\lib\pangomm-1.4\include
$(ROOTDIR)\include\glibmm-2.4
$(ROOTDIR)\lib\glibmm-2.4\include
$(ROOTDIR)\include\cairomm-1.0
$(ROOTDIR)\lib\cairomm-1.0\include
$(ROOTDIR)\include\sigc++-2.0
$(ROOTDIR)\lib\sigc++-2.0\include
$(ROOTDIR)\include\gtk-3.0
$(ROOTDIR)\include\pango-1.0
$(ROOTDIR)\include\atk-1.0
$(ROOTDIR)\include\cairo
$(ROOTDIR)\include\pixman-1
$(ROOTDIR)\include\freetype2
$(ROOTDIR)\include\harfbuzz
$(ROOTDIR)\include\gdk-pixbuf-2.0
$(ROOTDIR)\include\glib-2.0
$(ROOTDIR)\lib\glib-2.0\include
$(ROOTDIR)\include\libpng16
linker flags:
$(ROOTDIR)\lib
-lgtkmm-3.0
-latkmm-1.6
-lgdkmm-3.0
-lgiomm-2.4
-lpangomm-1.4
-lglibmm-2.4
-lcairomm-1.0
-lsigc-2.0
-lgtk-3
-lgdk-3
-limm32
-lshell32
-lole32
-Wl,-luuid
-lwinmm
-lpangocairo-1.0
-lpangoft2-1.0
-lfontconfig
-lfreetype
-lpangowin32-1.0
-lgdi32
-lpango-1.0
-lm
-latk-1.0
-lcairo-gobject
-lcairo
-lgdk_pixbuf-2.0
-lgio-2.0
-lgobject-2.0
-lglib-2.0
-lintl
note that the above $(ROOTDIR) in our case is D:\dev\msys64\mingw64
What ever IDE you want to use you just need to add global variable $(ROOTDIR)=D:\dev\msys64\mingw64 into your compiler/IDE settings together with all the flags in order to build gtkmm applications.
I use Code::Blocks, and if you don't want to struggle to much here is a complete solution, you can read more about Code::Blocks here.
Download Code::Blocks (the one without mingw) from official webisete and save into D:\dev\setup then install with "full installation" when asked into D:\dev\CodeBlocks\
once you're done open up Code::Blocks and go to:
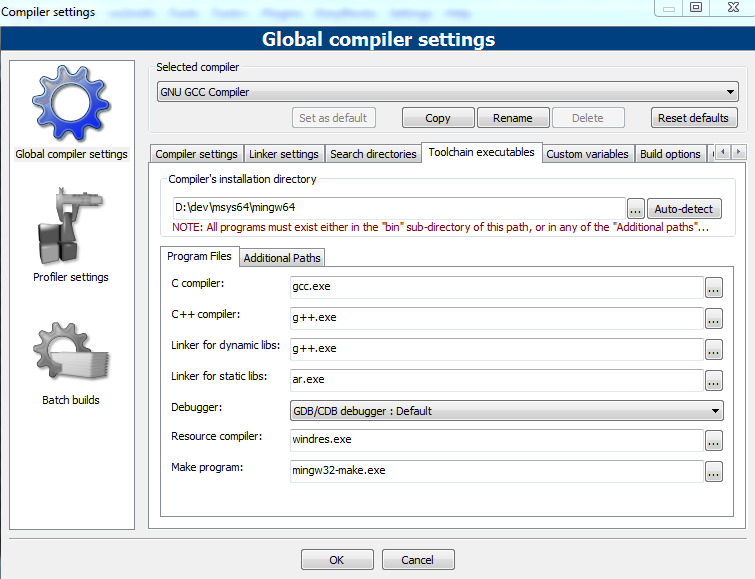
settings > compiler > toolchain executables and type D:\dev\msys64\mingw64 into "compiler installation directory"

Now go to: settings > compiler > custom variables click "add" and type:
INSTALLDIR into key field
type:
D:\dev\msys64 into Value field.

Click OK...
64bit users modify following fields in settings > compiler > toolchain executables
C compiler: gcc.exe
C++ compiler: g++.exe
Linker for dynamic libs: g++.exe
Linker for static libs: ar.exe
Resource compiler: windres.exe
make: mingw32-make.exe
If you're on 32bit Windows you will probably need to add "mingw32-" in front of these values.
Click OK to save settings.
Now open up the shell and type:
mkdir /d/dev/projects
Note that the above /d/ means D:\ partition, so if you're installing into C:\ you'll have to modify this.
At this point you can download my project so that you can perform final test and see the result of all the steps you have done so far.
download here. and save it into D:\dev\settings.
Once downloaded extract it into D:\dev\projects folder and go to Code::Blocs then click on:
File > Open > D:\dev\projects\wellcome\text_view.cbp
The project has 4 different configurations, you can choose your own like this:

and finally click on:
Build > Build and Run
Wait for build process to finish and come back here after you follow the output from application.
It is possible that you had to apply a fix due to errors coming out of console, make sure you don't miss that.
Next thing you do is download my project templates which will enable you to create new gtkmm projects without the need to enter all the flags each time.
download here and save into D:\dev\settings
Once you downloaded close down Code::Blocks and make sure you save "perspective" settings when prompted, then go to:
C:\Users\<your_user_name>\AppData\Roaming\CodeBlocks
If the above folder does not exist start Code::Blocks and review your compiler settings (repeat above compiler setup if needed) and close down Code::Blocs again by accepting "perspective" prompt.
Then create a new folder in AppData\Roaming\CodeBlocks , and name it "UserTemplates"
extract downloaded project (gtkmm folder as a whole!) template into that directory and restart Code::Blocks (if you didn't already)
run:
mkdir /d/dev/projects/test
Finally go to File > New > From template and select gtkmm, then click "Go" and navigate into D:\dev\projects\test (also give a name to the project when asked)
Make sure you select your configuration like in previous screenshot.
Once done you can start adding files to the project and start coding with latest gtkmm and C++11
There is still one problem with Code::Blocks, it's editor is white and staring into it can make your eyes hurt. So here is how to to make it black so that it will look like this:

What you need to do is download my black theme here and save it into D:\dev\settings
Close Code::Blocks and copy default.conf from
C:\Users\<your_user_name>\AppData\Roaming\CodeBlocks into D:\dev\settings, you can use it as a back up later just in case.
now run cb_config_share.exe from Code::Blocks installation directory.
On the right side select your default.conf from:
C:\Users\<your_user_name>\AppData\Roaming\CodeBlocks
On the left side select my theme (gtkmm.conf) and check all boxes... it should looks like so:

Click on "Transfer" button and confirm, click on "Save" button and confirm again.
close this dialog and start up Code::Blocks and open up our example from D:\dev\projects\wellcome (text_view) project to check out if that works..
STEP 6 (Compile documentation)
There is an official tutorial online, but it's not easy to follow these tutorials since you have to switch between your IDE and web browser in order to learn gtkmm.
What we want is to have this documentation available inside the IDE itself so that we can read and code in same time.
execute following commands if you want to have this comfort:
cd /opt
wget http://ftp.acc.umu.se/pub/GNOME/sources/gtkmm-documentation/3.12/gtkmm-documentation-3.12.0.tar.xz
tar -xvf gtkmm-documentation-3.12.0.tar.xz
cd gtkmm-documentation-3.12.0
./configure --prefix=/mingw64make
make install
mkdir /d/dev/examples
cp -R /opt/gtkmm-documentation-3.12.0/examples/others /d/dev/examples
cp -R /opt/gtkmm-documentation-3.12.0/examples/book /d/dev/examples
If the above wget link does not work or if you want to be sure to compile latest version you can modify these commands after finding appropriate link here
Now navigate into D:\dev\msys64\mingw64\share\doc\gtkmm-3.0\tutorial\html\ and right click on index.html and send shortcut to desktop.
Open up Code::Blocks and maximize it, then do: File > Open and then select index.hml from Desktop.
This will open HTML viewer, what you need to do is click on top frame of this viewer and drag it to the right edge of your screen so that viewer embed it self into CodeBlocks.
You will now have tutorial inside the Code::Blocks so that you can learn faster:

Inside D:\dev\examples you will find source files used in that documentation, by using our gtkmm project template you will be able to compile them without the need to do any kind of setup (except creating a project and adding source files from samples)
STEP 7 (Creating shortcuts)
If you don't know how to create shortcuts in Windows see this
Here is a list of files for which you will create shortcut inside D:\dev
D:\dev\msys64\mingw64\bin\glade.exe
D:\dev\msys64\mingw64_shell.bat
D:\dev\msys64\mingw64\share\doc\gtkmm-3.0\tutorial\html\index.html
D:\dev\CodeBlocks\codeblocks.exe
You might also want to change shortcut icons... see this how to change icon, there is "msys2.ico"
in D:\dev\msys directory which you can use for MSYS2 shell.
There is no way to integrate glade designer into CodeBlocks of course, but here is a screenshot on how to use glade designer together with Code::Blocks in similar fasion:

That's it! You now have super duper fully working development environment!
STEP 8 (Updating packages)
The most important feature of our installment is that you'll will be able to update your gtkmm to the latest version anytime in future, as well as other packages that we installed.
To do so you need to perform 3 simple steps:
pacman -Sy
pacman --needed -S bash pacman pacman-mirrors msys2-runtime
restart the shell
pacman -Su
STEP 9 (Frequently asked questions)
Q: How do I know if my version is the latest one?
A: type following:
pacman -Q | grep gtkmm3
compare your version output with this or this
Q: I'm getting an error and there is no fix for it in step 3
A: First make sure you followed the steps in correct order, applied fixes in right time and re-installed troubling packages, if out of luck you can ask for help in comment section bellow or use google to figure out what to do.
Q: Application menus are completely white, and no checkmarks or sub-menu arrows are visible
A: there seems to be a problem with gnome-icon-theme, to solve this find adwita-icon-theme
like this:
pacman -Ss adwaita-icon-theme
to install the package (x64) run this:
pacman -S mingw-w64-x86_64-adwaita-icon-theme
Q: How do I distribute my application to another computer? what do I need to ship with my application?
A: all the DLL's and other resources needed for application to run on any computer is found in
D:\dev\msys64\mingw64
OR
D:\dev\msys64\mingw32
Q: Can I build 32 bit applications with 64bit MSYS2 and vice-versa?
A: Yes, however you'll need to install both 32bit and 64bit GCC, in order to cross-compile.
Each installation will have it's own folder with it's own libraries found in:
D:\dev\msys64
OR
D:\dev\msys32
STEP 10 (Final thoughts)
I'm currently working on tutorial on how to compile latest version of gtkmm for use in Visual Studio, including compiling all official dependencies (GTK+ and so on), so you can check out either this site or this to see possible updates.
If you want to get access to beta tutorial before publishing final work please let me know.
Please feel free if you encounter any problems to share them in comment section bellow,
Feel free to share your general opinion on this tutorial or if you have something to add let me know so that I can update it for other people in future.
Hint: I you don't see an option to post a comment click on "no comments" or something similar.
HOT UPDATE:
From now on it is possible to compile most recent gtkmm and GTK+ with most recent Visual Studio,
including all of the dependencies...
To download set of Visual Studio projects checkout my GitHub page, on the same page you will find a wiki on how to get started.
On the same page you can find already compiled GTK+ and gtkmm3 binaries for use in Visual Studio 2013.
If you have questions I will be glad to help you compile your own libraries for Visual Studio. more information will be added in future.
Thank You!
~codekiddy
Hello!
ReplyDeleteThanks for this guide, it looks incredibly useful, and while I have not yet had a chance to try it out, I've read it, and it gave me hope that I might be able to port my gtkmm application to Windows. This is a lot of good work you've put in here, great respect, mate.
There is one particular thing that interests me, and I cannot find any information about it in your awesome tutorial: what are my options when it comes to distributing a finished app in binary-form? I cannot expect my end-users to follow your tutorial (:D), so traditionally I would distribute my .exe with a set of GTK .dll libraries. Where can I find these, or how can I make them? Will these work on another machine? Or maybe it is possible to link them statically, so that I can distribute just a single .exe? I would totally appreciate that if you could elaborate on this topic! :-)
And thanks once more, you totally rock! Such a pity that GTK devs only have released their libs in a completely outdated version for Windows. Kudos for fixing that!
Rafał Cieślak
Hi Rafal,
DeleteThank you for reading my tutorial, here are my answers to your question:
>> what are my options when it comes to distributing a finished app in binary-form?
to redistribute your release GTK+ or gtkmm application you need to ship it with correct dll's and all the resources such as icons that your application uses, users of your application should not be required download anything.
Once you complete my tutorial all the required dll's and other stuff will be installed on your system, when you build GTK+ application, it is linked against import libraries (*.lib), each import library has it's corresponding DLL, which you will find inside D:\dev\msys64\mingw64\bin or
D:\dev\msys64\mingw32\bin (for x86)
So, answer to your question is YES, it will work, but it's not only the DLL's that matter, the best way is to copy/paste your released application on separate machine and run it there, in order to see what exactly your application is missing, and then copy/paste missing stuff.
In fact all you need for your app to work on any system is found in D:\dev\msys64\mingw64\bin you just need to test it to be 100% sure.
>> Or maybe it is possible to link them statically, so that I can distribute just a single .exe?
Yes it is possible, but I would not recommend you that, because updating your application would require you to rebuild it and ship again instead of just shipping updated dll's, anyway even if your app is statically linked you will still need to ship icons and resources.
>> Such a pity that GTK devs only have released their libs in a completely outdated version for Windows.
That's the main reason why I created this tutorial, btw. I'm currently working on Visual Studio 2013 solutions to build GTK+ and gtkmm libraries within Visual Studio, If you feel comfortable to build all the stuff in Visual Studio you can check out my GitHub repository and download all the Visual Studio projects needed to compile most recent GTK+ version with most recent Visual Studio.
However please keep in mind that this work is still in progress and you're supposed to know how fight with bugs.
https://github.com/codekiddy2/Visual-Studio-gtkmm
Hello again!
DeleteI finally had some time to actually try out your tutorial, and I have managed to compile my gtkmm application. Again, huge thanks for your work!
I have also had almost no problems with deploying the app in binary form. Turns out that providing all needed .dlls and the resource files is just enough.
As a side note, even though I have a 64-bit system I chose to setup a 32bit environment, just to make sure that the app I build (and the libraries!) will work when moved to a 32bit machine.
There is, however, one particular thing that I am not able to solve: apparently GTK has some trouble picking up the right theme when run on my windows 7. This gives several visible effects, the one that affects me the most is the fact that application menus are almost completely white, and no checkmarks or sub-menu arrows are visible. Also, a ComboBox is missing it's down-pointing arrow, even though all other icons (eg. in a FileChooserDialog) are there, clearly working as they should. Sadly, GTK does not complain about any missing files, so I am unsure what should I look for.
What is interesting is the fact that the gtk-demo displays the menus correctly - blue-tinted, just like the default win7 theme, and everything else is fine too. So I though: "sigh, it's just my app's problem", but then I noticed that glade has exactly the same problem! It would then seem that it is not my app's fault.
Furthermore, I suspect you might be affected as well. According to your screenshot http://2.bp.blogspot.com/-mQwVyVYOLXc/VMNuazOvROI/AAAAAAAAA0s/pt3LA_Ml1BM/s1600/Untitled.png where glade can be seen, it's clear that its application menu looks different to the one that Code::Blocks has. To confirm that you are indeed affected, please have a look inside glade's View menu - all items there are CheckMenuItems, and should have a visible tick left to their text. If the ticks are invisible, then it would seem you are also able to reproduce this bug.
I'm still trying to investigate what's so different about gtk-demo and glade/myapp that even when using the same environment, the menus are different. I will update you on any progress. Or maybe you have any ideas on what might be wrong?
Best wishes,
Rafał Cieślak
Hello Rafal!
DeleteFirst, I'm really glad you managed to complete this tutorial! con gratulations!
Here are my answers to your questions:
>> application menus are almost completely white, and no checkmarks or sub-menu arrows are visible
...
>> To confirm that you are indeed affected, please have a look inside glade's View menu
Yes, I have just opened my fresh installed glade designer and encountered the same problem,
what I did to figure out the root of this problem is to run the glade from console and look for error messages,
You can do the same with your GTK+ application or any other application built with GTK+.
Once you do so there should be warnings/errors spamming out your console.
Obviously you'll see one of the problems is the gnome-icon-theme package missing some icons.
good news is that GNOME released some modern icons called adwita-icon-theme, once I installed that
problem has gone and glade designer was able to show checkboxes in menus and other missing stuff.
to find adwita-icon-theme type following into MSYS2 console:
pacman -Ss adwaita-icon-theme
to install it once you find it (x64):
pacman -S mingw-w64-x86_64-adwaita-icon-theme
Once you installed the above package run your application from the MSYS2 console. ie:
myApp
OR to check the glade designer for errors type into console:
glade
At this point your problem should be resolved, if there are still errors/warnings comming out please
let me know.
>> it's clear that its application menu looks different to the one that Code::Blocks has
Please keep in mind that GTK+ widgets such as buttons are verry different from native WINAPI buttons
they looks somewhat linux-like and there is nothing we can do about that part, that's how GTK+ widgets look.
>> I chose to setup a 32bit environment, just to make sure that the app I build (and the libraries!) will work when moved to a 32bit machine
Please keep in mind that you can install both 32bit and 64bit libraries with the same MSYS2 shell, they will be separated into 2 folder so that you can build both 32 and 64 bit applications at the same time.
If you encounter any additional problems please let me know. thanks!
Kind regards!
~codekiddy
Thanks for your reply.
DeleteInstalling the adwaita icon theme did help. So it turns out I was close to solving it on my own, but I never realized that the infamous adwaita theme comes with a custom set of icons (it makes sense, though).
And yeah, I always check console output for any interesting messages, but as I mentioned, there was nothing there. If I removed any other icon theme, there would be thousands of GTK messages complaing about missing icons, but with adwaita missing there is no error or warning of any kind. Strange.
Anyway, it's working perfectly now - huge thanks for your hint.
About the native theme - I was more interested in the fact that the gtk-demo used native-looking widgets. But well, gtk-demo runs on gtk 2, so there is no fancy CSS engine etc, and maybe such imitation it was achievable back then. But I am fine with that, staying on 3.12.
Thanks for all your time!
Cheers!
Rafał Cieślak
This comment has been removed by the author.
ReplyDeleteHello,
ReplyDeleteThank you for your explications but i've got any problems.
Could you help me ?
1> $ pacman -S mingw-w64-x86_64-pkgconf
error : impossible to find the target: mingw-w64-x86_64-pkgconf
2>$ mkdir /mingw32/lib/gdk-pixbuf-2.0
« /mingw32/lib/gdk-pixbuf-2.0 »: No such file or directory
3>$ mkdir /mingw32/lib/gdk-pixbuf-2.0/2.10.0
« /mingw32/lib/gdk-pixbuf-2.0/2.10.0 »: No such file or directory
4>$ pacman -S mingw-w64-x86_64-icon-naming-utils
error : impossible to find the target : mingw-w64-x86_64-icon-naming-utils
5>$ pacman -S mingw-w64-x86_64-gnome-icon-theme-symbolic
error : impossible to find the target : mingw-w64-x86_64-gnome-icon-theme-symbolic
Rhamm
Hi, got some problem here. When everthing is done installing before "STEP 4 (Testing installation)" I decided to sleep and continue for the next day, but when I got in in to test the installation at "pwdpango-querymodules --update-cache" command I god this errormessage "bash: pwdpango-querymodules: command not found" tried to proceed with "pkg-config --cflags --libs gtkmm-3.0" but it said "Package gtkmm-3.0 was not found in the pkg-config search path.
ReplyDeletePerhaps you should add the directory containing `gtkmm-3.0.pc'
to the PKG_CONFIG_PATH environment variable
No package 'gtkmm-3.0' found
". what could be the problem?
I forgot to mention that I compiled gtkmm application as a console application under code::blocks. it brings up an extra console windows... which can be turned off some where in the settings. i forgot where thats checkbox was at....but its possible to disable the extra console box.
ReplyDeleteHi,
ReplyDeleteI followed your excellent tutorial today to the letter so I have the latest of everything but I still do not get any system icons ie.minimise, maximise or X close. I am using Windows 10 if that makes any difference.
Se que este post es antiguo pero los link estan muertos :( nadie los tiene?
ReplyDeleteplease update this post
ReplyDeleteVery informative and useful historical post. I see you have a lot of other cool stuff available at your website, simply bookmarking it to check in spare time. Thanks and keep the good work up.
ReplyDeleteWooden Swing sets
Looks fine, and I actually got things at work, but.. this tutor is hopelessly outdated. I cannot get some packages installed while it seems they'r removed from the git repository (impossible to find) like pango-querymodules.. I cannot get the line 'pkg-config --cflags --libs gtkmm-3.0' to work (it cannot find gtkmm-3.0 !!) and we're currently steping into gtkmm-4 but that doesn't work either... Pitty. Can you update this tutor, or should I better search further. My goal is develop some stuff for the linux-environment which also should work (after recompilation) in windows. It's a heard struggle, that's for sure. But thanks for this tutor, it helped me at least to get msys2 installed
ReplyDeleteCould you please upload your gtkmm 3.16 pre-built release x64 binaries for VS2015?
ReplyDeleteGreat and I have a super proposal: How Much House Renovation home improvements to add value
ReplyDelete